Showing posts with label Copic. Show all posts

Tuesday, 29 March 2022

Teacup Kitten - My Besties

 Hi all, 

I am over on the the My Besties Aussie Challenge blog today and would love you to have a look at my entry for the month of April.. I love being on this team as the cards created are gorgeous. 

I am using the CUTE KITTENS AND A TEACUP KITTEN 3 DIGI STAMP by Sherri Baldy.


I have coloured this image in with Copic Markers.


Don't forget to check out My Besties Aussie Challenge Here
to see all the wonderful cards the Design Team of My Besties are creating..
You can purchase her HERE
Check out my facebook page and say hi while you are there.. CRAFT MAKING

I hope I have inspired you
to create glorious things..
Hugs
Donna xxx

Sunday, 5 December 2021

Homely Florals Canvas - Couture Creations

Hi all,

HOMELY FLORALS COLLECTION

I am loving this collection from Couture Creations.

I coloured these gorgeous images in with the COAPC2 Twin Tip Alcohol Ink Markers and decided to create a small canvas to bring brightness to a dark room.. I really enjoyed making this, so relaxing and fun to do.. 


Maybe my new favourite alcohol ink. I painted the easel with white than added the Golden Age Sunflower Alcohol Ink along the edge to match the canvas. 


Fussy cutting is quite relaxing and believe me I did lots of fussy cutting to give me several layers on the canvas. I die cut the 'beautiful' word four times and adhered together for dimension then adhered it across the flower as shown. Glossy Accents on top to give some shine and some glitter and the canvas was finished.. 


  I hope I have inspired you

to create glorious things
Hugs
Donna xx

For Stockists click the link below:

Materials: 

CO728475 Stamp and Colour Outline Pad Black 

CO727342 Blending Tips

CO726325 Quick Dry Adhesive


CO 728658 Diecut Ephemera Set

 Alcohol Inks

CO 727337 Blending Solution

CO 728479 Golden Age Snow

CO 728488 Golden Age Verdant

CO 728481 Golden Age Onyx

CO728491 Golden Age Topaz

CO 728496 Golden Age Turquoise

CO 728485 Golden Age Amethyst

CO 728502 Golden Age  Burnt Sienna

CO 728493 Golden Age  Sunflower 

CO 728487 Golden Age Cobalt

CO727377 Butter pearl

CO 727374 Decption

CO727375 Fern Pearl

CO 727370 Lake Pearl

CO 727378 Gold Pearl

CO 727334 Goldfish

Alcohol Inks

CO 727337 Blending Solution

CO 728502 Golden Age Burnt Sienna

CO 728493 Golden Age Sunflower

CO727374 Deception Pearl

CO727377 Butter pearl


- 377 Olive Green
- 9544 Leaf White
- 7493 White Lotus Leaf
- 2288 Tender Pear
- 618 Yellow Green
- 155 Light Skin 
- 489 Skin Colour
- 190 Carnation
- 193 Red
- 187 Geranium
- 3572 Peach
- 205 Pale Red
- 206 Deep Red
- 120 Canaria Yellow
- 917 Baby Yellow
- 142 Fresh Yellow
- 126 Golden Brown
- 123 Melon Yellow
- 7507 Warm Gold
- 263 Tender Purple

CO728094 Stamp Cleaner 

CO727749 Acrylic Block Set

CO725716 Magnetic Platform 

CO727860 Glass Mat Art Shed Angel 

CO727162 Precision Tweezers 

CO728468 Guillotine Trimmer


Sunday, 3 October 2021

Little Dragon Card - My Besties Aussie Challenge

 Hi all,

My card for September over on the My Besties Aussie Challenge Blog.. She is gorgeous isn't she!!!

I coloured her in with copic makers and knew straight away what paper I was going to use.

You can see her here:  Autumn Dragon 2 Here


I cut a card base of 5 1/2 inches square in white. I made a panel in aqua with a piece of pattern paper as the second panel and adhered to the base.. I die cut two panels from the dies and adhered on top. I stitched around all panels.


I cut three different flowers and adhered together. Placing it in the top corner with darling gold spotted leaves and a pearl in the centre of the flower.


I created the same flower in the bottom corner but adhered this on a section of a fence.


Two little flowers on the fence with pearl centres.


Home dyed ribbon on the Wrapped Heart die. 


Coloured with Copic Markers and embellished with Dimensional Magic and Kindy Glitz.. 


Don't forget to check out My Besties Aussie Challenge Here
to see all the wonderful cards the Design Team of My Besties are creating..
You can purchase her HERE
Check out my facebook page and say hi while you are there.. CRAFT MAKING

I hope I have inspired you
to create glorious things..
Hugs
Donna xxx

Materials:  XXL sq Frames Frilly #1 - Go Kreate dies 
Frilly sq #1 - Go Kreate dies
Nightfall Paper - Mintay 
CO728381 - Delightful Flower die - You Go Girl Collection Couture Creations
CO728380 - Flexing Branch die - You Go Girl Collection Couture Creations
Fence, Flowers, Wrapped Heart dies - DooHickey
Dimensional Magic
Kindy Glitz
Tombow Glue
Tattered Rose - Distress Ink

Saturday, 6 October 2018

My Besties - October- Autumn


Well October is here and today I have a gorgeous girl with Autumn hair for the My Besties Aussie Challenge blog.. You seriously have to go over and check out all
the gorgeous cards on show.. HERE
She is lovely and natural and certainly looks like she loves the outdoors..
You can purchase her HERE

Big Eye Big Head Dolls Digi Besties Dora Belle


I wanted her to be a little different with a background that encompasses out doors and shabby chic a little.. I like the card so was happy with my choice lol 
I coloured her in with copic markers..

I hope I have inspired you 
to create glorious things
Hugs
Donna xx 

Friday, 14 September 2018

My Besties - September Girls


Wow, the months have certainty flown this year, is it because we are getting older and our lives are so busy!!.. Well for this months Design Team projects I have created three cards because I loved the images so much.. How wonderful are they.. They are all coloured in with Copic Markers..

My favourite of the three, she is just so adorable HERE


I love how cute she is, you just have to go and get her HERE


She is beautiful and of course you can buy here HERE


Don't forget to check out My Besties Aussie Challenge Here
to see all the wonderful cards the fans of My Besties are creating..

I hope I have inspired you
to create glorious things
Hugs
Donna DT


Saturday, 11 August 2018

Voodoo Smeared - RSD - Design Project


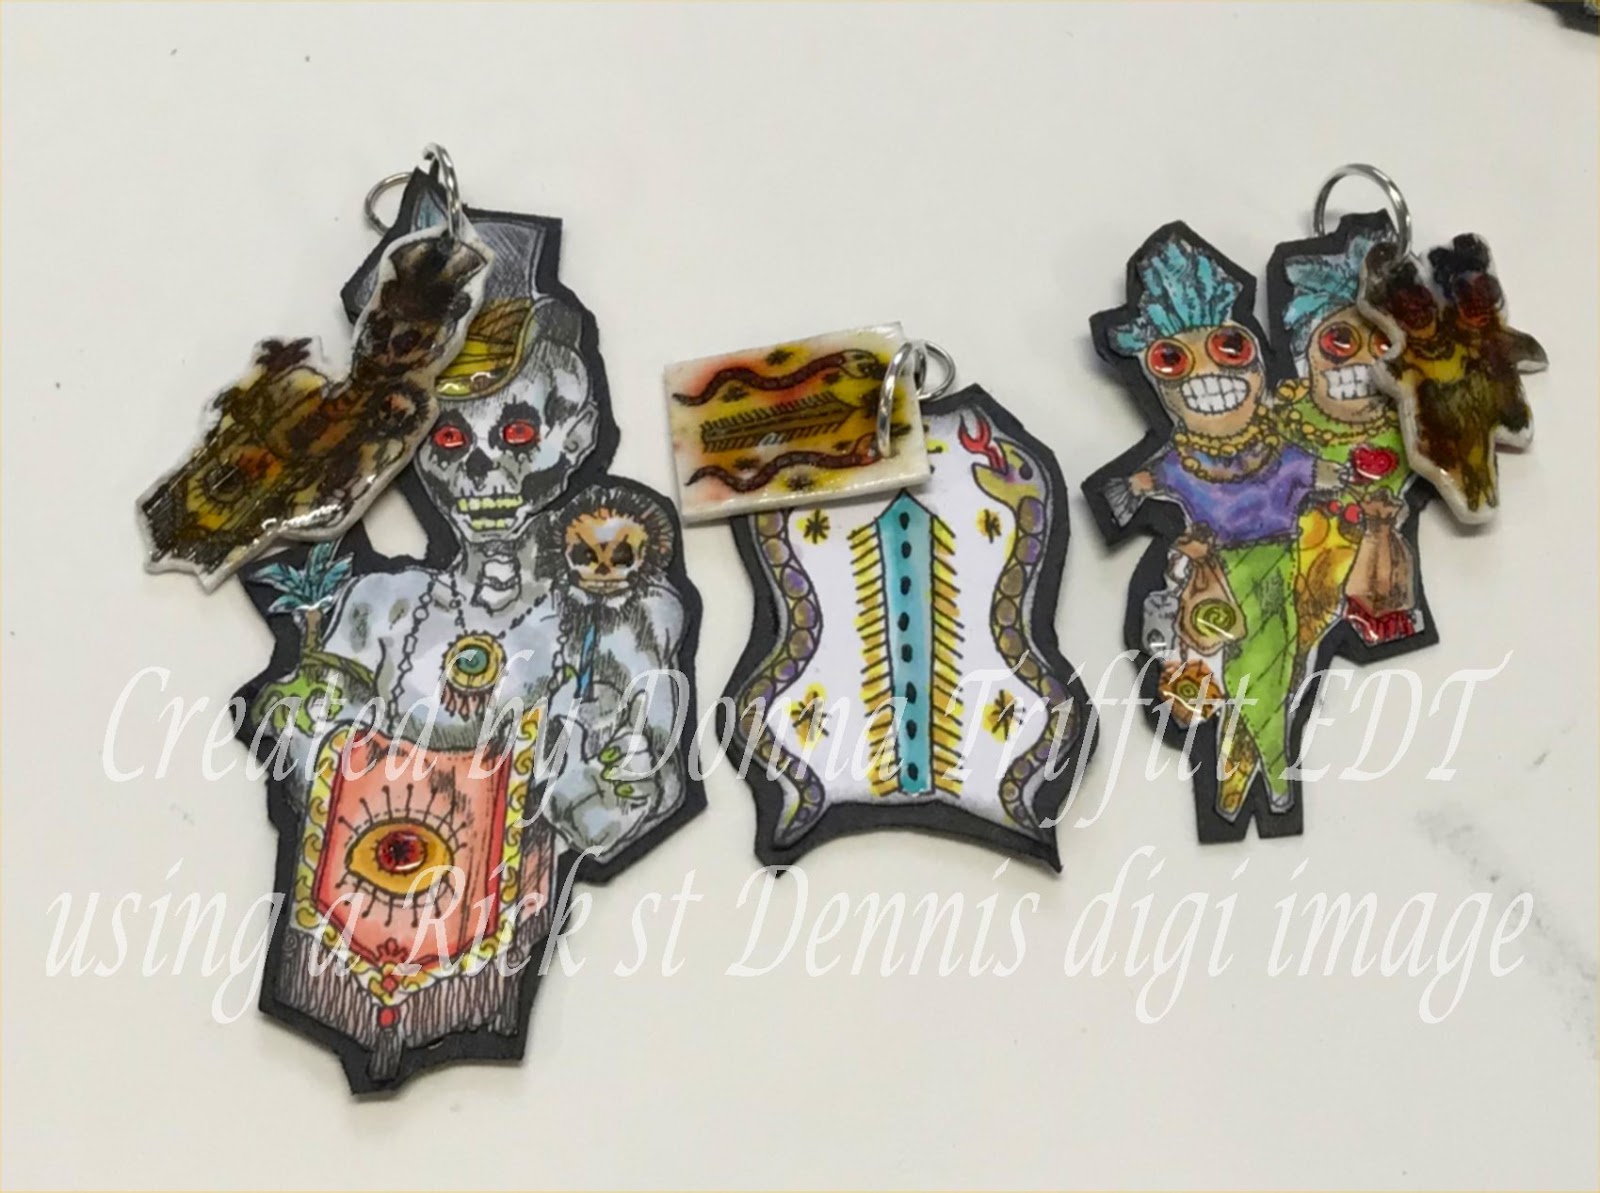
When I first seen these Voodoo Digi Sheet Smeared, (Purchase HERE ) by Rick St Dennis
I thought wow I love them.
They were quirky, fun and a bit spooky, everything I like..

The next thought was what am I going to do with them?? Well I decided I would create
 a set of Key Rings and place them all on one big ring to hold them..

Of course I couldn't leave it at that I had to make a box to store them in..

I printed the images on to Copic paper and coloured them in using Copic Markers.


I also printed a set on to white Shrinky Dinks and coloured them in with markers.. I found once I placed the Dimensional Magic on top it actually smeared the ink from the markers..


Once the images were coloured in, I fussy cut them and then adhered them on black cardstock. I then cut roughly around the edges. I then added two small rings on each image.
With these two images I placed feathers behind the black cardstock and wrapped fancy twine around the top,, 


On each image I placed one of the Shrinky Dinks or a small metal charm.


The photos really do not do justice to how vibrant these are..


All done and attached to the ring..


I thought the ring looked a bit bland so I added some ribbon.


Looks Brilliant don't you reckon.


I created a box to place them in..
I roughly painted a box with white Gesso then again roughly with blue acrylic paint..


I adhered two different trims around the box.. Black pom pom trim on the lid and a red lace on the actual box.


I added two layers of 3D Foam tape to make the image stand out off the box..


The Key Rings inside the box.


I hope I have Inspired
you to create
Glorious things..
Hugs
Donna xx

Monday, 6 August 2018

My Bestie August Girl

Hi all,
So for the month of August in the My Bestie's world I created this 
gorgeous card to showcase this little sweetheart..


Isn't she pretty!!  I coloured her in using assorted Copic Markers and fussy cut many pieces including the tiny hearts and stars.. I added 3D foam tape under them as well as the clouds, the flower at the side and the envelope itself.  Using Nuvo Crystal Glaze for the clouds, hearts and stars gave the card that 'something special'.
I distress the edges and sewed around the mats to give some interest to the card..
Die cutting a Butterfly Border from Joy Crafts in Crystal glitter cardstock seemed to suit our sweetheart with her glittery wings.. 


You can see it at My Bestie Aussie Challenge  HERE

I hope I have inspired you
to create glorious things.
Hugs
Donna x

Wednesday, 1 August 2018

Kawaii Kuties Paperclips and Folder - RST

Hi all,
Today I have a new project to show you for Rick st Dennis using the Kawaii Kuties digi images that he created.. I love love these little faces.. Kute as!!
 
You can purchase these gorgeous images HERE
And don't forget to check out all the brilliant creative work HERE
 
For this project, I decided to make papercips and a folder to place them in and I LOVE it totally..
I coloured them in with Copic markers, fussy cut them and adhered them with 3D foam tape..
 
 
I placed the images on a Scallop circle then on a bigger circle with a paperclip in between the layers.. A little ribbon finished the images of I think.. 


The Album closed. I used Graphic 45 - Typography Cardstock.
 
 
All the components for the album.. 

 
All Measurements are in inches..
Ink around all the edges with Distress Ink Weathered Wood
 
Base - Black Cardstock - 12 x 7. Score @ 4, 4 1/2, 8 1/2, 9
 
Pockets - Black Cardstock - Cut one @ 4 x 7 1/4. Score 1/4 two short sides and one long side.
Cut one @ 3 3/4 x 7 1/4. Score 1/4 two short sides and one long side.
Cut two black Bands @ 4 x 1 1/4. Score 1/4 each short end.
Cut two black Bands @ 4 1/4 x 1/4, Score 1/4 each short end.  
 
Strips - 1/4 x 6 3/4 Cut 4
 
 
Mats
Base - Front
Outside - Left Side - 3 3/4 x 6 3/4
Right Side - 2 3/4 x 6 3/4
 
Inside - Left Side Pocket -  3 1/2 x 6 1/2
Middle Pocket - 3 1/4 x 6 1/2
Right Side - 2 3/4 x 6 3/4
 
Bands - 3 1/2 x 1 Cut two
4 x 1 Cut two
 
Cut corners from the scored area, Turn under and adhere the folded areas to the card inside card base.  
 
 
Face the openings of the pocket to each other as shown..
 
 
Front of the Album.
I cut the prongs of the brad and adhered it with 3D foam tape.
I used a strong glue to place the large plastic paperclip on the front and tied a small piece of ribbon on it. 


I adhered 3D foam tape under the Kawaii Kuties.

 
The folder opened with the Kawaii Kuties paperclips on the Bands..
You can place extra paperclips in the pockets..


 I was going to use this gorgeous paper, So I cut it all out and then decided I didn't like the Kawaii Kuties Faces with it.. I think it was because of the hair colours..

 
I hope I have inspired you to create Glorious things..
Thank you for stopping by..
Hugs
DONNA xxx